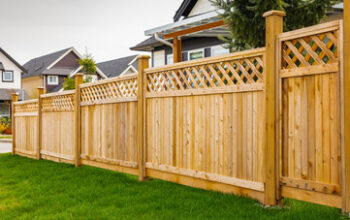
A fence is a wall or barrier made of wood, masonry, metal, or other material that encloses space and separates and secures parcels of land. It is also used to demarcate property lines or to contain livestock.
Before beginning fence installation, check with your municipality to find out about zoning laws and the maximum height allowed. Then mark your property line to ensure the fence will be built inside your property boundaries. Talk to a professional R.C Fence LLC contractor to build your fence.
Posts
Fence posts are the cornerstones of any fence. They must be firmly set in place to help keep the rest of the fence straight and secure. While it might seem like a difficult task to accomplish, installing fence posts is quite doable on your own if you have the proper materials and tools.
Coastal 101: Setting Posts
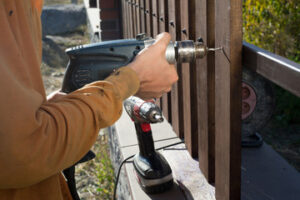
First, you must dig holes for each of the fence posts that you want to install. Make sure that the hole is at least three times the width of the post itself, and it should be buried about 6 inches below ground level. It is important to remember that all underground cables and lines should be located before digging. You can contact your contractor to have this done for free, and it is highly recommended before you start fencing your yard.
Next, you will need to use a stake or a batter board to mark the locations of each fence post. This will help you to ensure that each post is properly aligned with the others and will be able to withstand the weight of the fence panels or rails that are going to be placed on them. Ideally, you should try to use pressure-treated wood to ensure the longevity of your new fence posts. These will contain a layer of sapwood around a core of heartwood that will help to protect the posts against moisture and decay, and they are available in a variety of heights.
You will also need a level to ensure that each of the posts is straight and will be stable once they are installed. A level is a tool that can verify whether a surface is level (horizontal) or plumb (straight up and down). If you choose to use concrete to set your posts, a tamping tool will be required to compact the gravel or concrete mix that is in each of the holes.
Many people prefer to use concrete over expanding foam when it comes to setting their fence posts. This is because concrete will usually set much faster than expanding foam. In addition, concrete is very versatile and can be used for various purposes on a construction site.
Rails
Depending on the design of the fence, rails – also called stringers – may be installed between or across posts. These are generally two-by-fours that will be what the fence boards are affixed to and will help to limit sagging or bowing over time. A general rule of thumb is to use a horizontal rail for every 24 inches of height, so that means at least one bottom and top rail. Some designers may even opt for a middle rail, although this is not always a structural necessity.
Typically, the best method for installing rails is to nail them to the posts with rust-free fasteners or galvanized fence brackets (also called cleats). It’s important to make sure that the bottom rail is placed at least six inches above ground level – this helps to keep it away from moisture and prevent damage over time. If your landscape is on a slope, it’s a good idea to run the rails parallel to the terrain or install them in a stepped fashion.
If you’re using a new rails application, you will probably get an error when trying to push your code. This is because rails expects plain actions to have views associated with them so that they can display information about their state. However, since you haven’t created any views yet, this error will be raised. This is okay — you will learn more about views later on in this course.
Pickets
The pickets that compose a fence add a touch of personality. They also keep pets, children, and wandering livestock in a safe yard. If your wood fence is looking faded and shaky, it’s time to install new pickets and make your backyard a more inviting place to relax. Choose from prefabricated panels, available at home centers and lumberyards, to speed up the project or hire a contractor to do it for you.
Wood fences are heavy, so lift them carefully to avoid straining your back. Before starting to build, check your house title or call a local land surveyor to find out if any property easements cross below your intended building site. If this is the case, contact the utility locator hotline to have buried services marked with washable paint. This will prevent you from digging into and disturbing water, gas, or power lines during the fence construction process.
Dig a hole about 1/3 of the height of the post for your wood fence. This will allow you to safely set the posts and concrete without over-exerting yourself. If you’re using quick-set concrete, mix the cement right before you start constructing your fence so it can set relatively quickly.
When constructing the first row of pickets, measure and mark where the top of each will be installed on the fence rails. Then, use your level to ensure that each picket is parallel with the rails and each is evenly spaced. Once you’ve installed the first row, move on to the second.
As you work, pay attention to how the pickets line up with each other and with the corner and end posts. A poorly placed and not level picket can affect how well your fence functions later, so take your time.
When you’re installing the last picket at one of your end posts, consider spacing it out a little farther than the other pickets. This will help your corner pickets to line up evenly when you get to it later on in the project.
Gates
Adding gates to a fence allows you to enter and exit your property without walking around the entire perimeter of your home. Gates can also be used to create a private area where children and pets can play safely. They can be manual or automated, depending on your needs.
Creating a gate requires accurate measurements and proper preparation of the site. It is a good idea to have someone else assist you in this step, as it will make the process much easier and safer. The first step is to measure the opening where the gate will be installed. This measurement will help you determine the size of the gate you need to install and ensure that it fits in the opening.
Before digging holes for your gate posts, always call 811. This number will help you identify underground utility lines so that you do not accidentally hit one and cause a costly and dangerous disruption. You should also ask your neighbor whether a fence is permitted on your side of the property line. This will avoid a legal conflict arising over boundary acquisition and adverse possession years down the road.
The location of the gate will also affect the size and type of gate that you choose to install. For example, if the gate will be swinging into your property, you may want to consider installing a double-swing gate that can be opened both ways. This will require extra preparation because you will need to have an area large enough for a dual-swing gate to fit in the opening.
It is best to install gate posts and hinges before building the fence. This will prevent the wood from warping or rotting during construction. Then, when you finish the fence, you can install the gate. If the gate will be a dual-swing gate, it is best to install the first side at a time and then match up the second side before setting the post in concrete.
If you plan to build a fence, consult the rules of your homeowners’ association or neighborhood association to find out what types of materials and colors are allowed. Also, check to see if any covenants dictate how far back a fence must be from sidewalks or property lines, and if you will need a permit for the project.